 Introduction:
These rules are designed to give a fast-paced game. As mentioned elsewhere,
we decided to slant the situation from the point of view of the usual villains
of the piece, the Daleks. Rather than a simple 'blast everything'
skirmish, however, we have also added some role-playing aspects, i.e. the search
for Davros and the different 'encounters' which the teams meet en-route (either
for good or ill). By varying the type and set-up of these encounters, no two
games will ever be alike.
The other key design requirement was not to use detailed damage charts and order-writing.
What we have instead is an 'initiative' system based on the random drawing of
'activation chits' which, coupled with the 'command & control' rules, will
give you much food for thought without the need for over-complexity. And whilst
luck always plays a part in these games, you can do yourself some good by thinking
of your next moves before you are actually called - it is a fast game, and a
response of "…err, umm…" is likely to be viewed harshly!
Scenarios:
Scenario wise, we play two sorts of game. We play one where the scenario for the four players is determined by the drawing of scenario cards. These cards amount to 'save Davros' or 'Kill Davros' (following the timeline background). These player scenario cards are drawn in secret so that players do not know whether they are trying to destroy their target or transport him off of the prison complex. This leads to a degree of tentative alliances (usually) until the chips are down when the players usually start betraying each other and opening fire. Mind you, sometimes they just open fire at each other anyway! (they are Daleks after all). The other sort of games we play are just straight forward combat fights, sometimes with an objective, sometimes not.
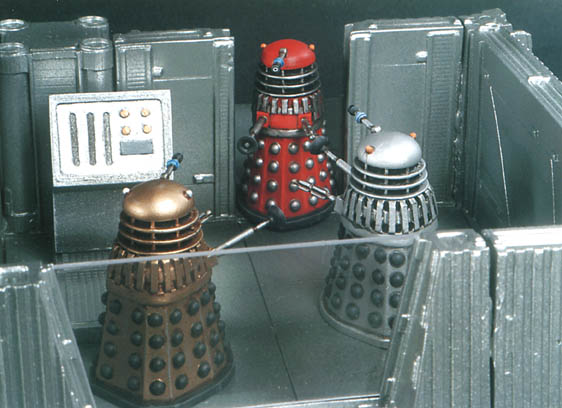
Teams for the scenario based games (which are what we run at shows for the public to participate in) involve a player having a set team of 7 Daleks to begin with: 6 regular warrior Daleks and a Command Dalek (easily distinguishable in colour from the others in the team). More Daleks can be picked up along the way with encounter cards, along with other goodies like Special Weapons Daleks, hover platforms and so forth, but that's what the teams in the scenario games start with: 7 each.
The game starts with four teams which begin, one in each corner of the boards. We have tried more teams - 5 and 6 - but, to work best, they need our boards arranged in a different way (I'll come on to the terrain later).
There are some umpire run opponents on the board to start with. Davros is usually being guarded by a squad of up to 10 Imperial Daleks. These will attack Dalek player teams indiscriminately /at the whim of the umpires. To stop them being too deadly, though, they only get two action points per chit they pull out and not 4 points like the players' Daleks.
Just for a change, we have tried games with the UNIT team as a player team, which worked quite well (faster than Daleks but lacking in fire power).
The boards we use are very flexible and can be arranged in a number of ways. The individual boards are divided into a 6x6 grid of floor squares and we usually use them about 3 big boards wide by 9 deep (giving 18 squares by 54). Sometimes we play 4 by 7 (giving 24 squares by 42).
Terrain is randomly distributed - most, but not all large boards have a room in them or other free standing feature. The only things we position precisely are rooms in each corner near where the players start, and walls that ensure that the players cant open fire on each other at the very beginning.
Lastly, the central complex that holds Davros is always in a specially locked
section that the players need keys for (which they can only get by investigating
encounter cards, forcing them to do so).
Finally, a word about tactics - remember that you are playing one of the most
evil, callous races ever devised in science fiction, so be prepared to ignore
taking casualties as long as they get you closer to your overall objective.
It may be fun blasting everything in sight with the new super-ray you've just
found, but the other teams may be using that time to accomplish their objective.
There is also nothing to prevent you from making (temporary) alliances with
other teams, but remember that only one can ever be the ultimate winner…
![]()
Set-up:
| Players are each allocated or choose an entry point (normally the four corner boards) for their teams - usually 7 Daleks to begin with: 6 regular warrior Daleks and a Command Dalek (easily distinguishable in colour from the others in the team) | |
| Various 'Encounters' are nominated to rooms or areas (markers [face-down] may be used - normally 1 per room). | |
| Place 1 ID chit per model in the 'initiative' pot (preferably different colours per team). | |
| Place Davros in his HQ and distribute any umpire controlled Daleks (etc) around the place, as required. |
Turn sequence:
| INITIATIVE: umpire draws ONE team ID chit at a time from pot | ||
| Player owning that team chooses a Dalek which has not already moved. It may then perform up to FOUR 'actions' (see Appendix A for details of actions): | ||
| Only a maximum of 3 out of the 4 actions may be the same type; | ||
| They may be taken in any order, however i.e 'Move /Fire /Open door /Fire' | ||
| Note also the effects of the 'Command & Control' rules below | ||
| Umpire places the chit next to the model concerned (to show that it has moved). | ||
| Repeat steps 1-3 until all chits used-up | ||
| Collect-in all the active chits, replace them in the pot and start a new turn. | ||
Winning the Game:
There are two ways to win this game
| Davros or the Dalek Supreme is killed. Fire on Davros or the Dalek Supreme in the normal way using the Firing Chart. Destroy him and you win the game. | |
| Transmat/Extract Davros or the Dalek Supreme. Teams whose mission is to extract, can laser designate him to effect a transmat extraction, at short range ONLY, instead of firing at him. This, like firing, costs an Action Chit per attempt and takes place immediately. There is no requirement to hit no roll of D6e's but, for each chit roll three D3 once, as if a hit had been achieved. The results are exactly the same as the chart to fire on Davros or the Dalek Supreme EXCEPT that DESTROYED means you get him away and that ESCAPES means he beams away but you lose him, a minor victory for the team as he is still alive somewhere… |
![]()
Notes:
Command & Control: Any Dalek Commander's zone of control is all of
his Daleks that are within ONE board of that Commander. If outside this zone
of control when activated a Dalek may ONLY move directly towards the leader
next time it is activated - no other type of action is allowed. A Dalek may
move out of his Commander's zone of control in a number of ways. First, it may
move too far away from it's Commander, Second, it's commander may move too far
away from it. Third, the Commander could be destroyed and the new one created
(see later) is out of range. Lastly, there is the special movement afforded
by the 'transmat' (matter-transmitter), which has special rules: For
Command Radius, the board that a transmat's far end sits on is considered
ajacent to the board of the sending end. Lastly, If the group leader is
destroyed, no other Dalek in that team may expend actions (move etc) until a
new leader is created, so that has to be the next action! This takes one whole
action chit.
Effects Of Fire: It may be that a Dalek will sometimes be unable to
move/fire etc as a result of previous actions by another team (i.e. it's been
shot and 'stunned'!). In that event, it will be marked with an ID chit just
as if it had already moved. Such effects only ever last for the current turn,
however if a unit is destroyed the team also loses a chit.
'Defenders': During the course of the game other units (guards, neutrals
etc) may be activated by encounters. When this occurs, place a single ID chit
(distinct from the normal Dalek teams) in the pot. These units then activate
when the chit is drawn (normally at a reduced level - say, 1 'move' and 1 'fire'
action).
Note: The different Dalek groups objectives in the game are either to
destroy or retrieve their creator Davros. Destroying Davros and retrieving/
rescuing him are achieved in much the same way. Shooting him, in the usual fashion,
will destroy him (although he's a tricky target…). Rescue is effected by
a Dalek from the relevant faction who finishes the end of an activation turn
in an adjacent square to Davros expending that team's next available activation
chit (if one is available for that team) placing a transponder on Davros. He
is then assumed to be 'Transmatted' away by that faction. Whichever faction
destroys or Transmats away Davros first wins the scenario.
![]()
|
ACTIONS |
NOTES |
|
MOVE a Dalek
|
Move ONE square in any direction (includes diagonal movement); there is no cost to turn in any direction at any point during the move. Note: Basic movement may be enhanced (or restricted) by the effects of any Encounters along the way; check the data card for details. Also, for larger playing areas or smaller scales, you may double the movement rate (but not the number of actions) so that for every action a Dalek may traverse TWO squares. RESTRICTIONS:
MOMENTUM MOVEMENT BONUS: If a DALEK expends THREE consecutive actions moving in a straight line, it may move another square forward as a momentum bonus (player choice). NO turns are allowed in this instance, however, including at the beginning or end of its run. SLOPES and OTHER 3D MOVEMENT
|
|
OPERATE a machine |
Includes opening/closing doors, turning on machines (hover-platforms, transmat (matter-transmitter), or any other devious devices which are discovered as a result of Encounters) Certain items may require a Dalek to remain with the machine for it to be in operation each turn. Note: access to Davros inner sanctum may require a special key or code which can be found in one or more of the adjacent rooms of the complex |
|
SEARCH FOR an encounter marker |
Allows for time to examine the item etc; you will be briefed by umpires (once the current Dalek has finished all four of its actions) and also given a reference card detailing the range of options and method of operation. Note that some larger rooms may contain more than one Encounter |
|
FIRE at another unit
|
|
|
Other! |
|
![]()
Rules
Appendix B Weapon & Range Data:
|
Weapons - Daleks |
Die |
Range Bands |
No. of Dice |
Notes |
|
Exterminator Ray (standard) |
D6e |
Short: up to 6 squares |
3 |
  |
|
Exploder Ray (as fitted to Special-Weapon Dalek - see note right) |
D6e
|
Medium: 7 to 12 squares |
2 |
|
|
Dalek fitted with Machinegun |
D3 |
Long: 13+ squares |
1 |
|
|
Weapons - Other Races |
|
|||
|
Rocket Launchers (RPG type weapon) |
D6e |
TO OBTAIN A HIT
|
||
|
Assault rifles, SMGs |
D3 |
|||
|
Grenades |
D6e |
|||
|
Highly-Energised Baseball Bats |
D10 |
|||
|
Cyber-ray and Sontaran Mezon Gun |
D6e |
|||
![]()
Rules
Appendix C Damage Resolution:
|
DAMAGE RESOLUTION (by target type) |
||||||
|
Roll |
Ranking* |
Type of Hit |
Vs Daleks |
Cybermen (and other Bipedal Aliens) |
Humans |
Davros! |
|
3 Treble 1 |
6 |
DALEK explodes! |
Not only is the target destroyed but for anything in an adjacent square roll ONE critical for that also; if operating a machine, that too is destroyed! |
Destroyed |
Destroyed |
Destroyed |
|
4 |
3 |
Deflected! |
Roll again for effect against any one adjacent unit (chosen by the targeted player); no effect if secondary |
Miss! |
Take cover ONE turn |
Miss! |
|
5 |
1 |
Take Cover! |
Dalek immediately moves a full move away from the firer towards nearest cover; no other action allowed (mark with an ID chit); no effect if already moved |
HIT! - but no effect! |
Miss! |
Loses Temper! |
|
6 |
2 |
Systems failure |
Dalek may not be activated this turn; no effect if already activated (advanced game: no moving). |
HIT! - but no effect! |
Destroyed |
Run away! |
|
7 |
4 |
Lose temper |
Dalek fires once at nearest other Dalek - friend or foe. Chose closest to line of fire but turn to face if required. |
Stunned ONE turn |
Destroyed |
Escapes! |
|
8 |
5 |
Destroyed! |
Remove the model from play |
Destroyed |
Take cover ONE turn |
Destroyed |
|
9 Treble 3 |
6 |
DALEK explodes! |
Not only is the target destroyed but for anything in an adjacent square roll ONE critical for that also; if operating a machine, that too is destroyed! |
Destroyed |
Take cover ONE turn |
Destroyed |
|
Treble 2 |
6 |
DALEK explodes! |
Not only is the target destroyed but for anything in an adjacent square roll ONE critical for that also; if operating a machine, that too is destroyed! |
Destroyed |
Take cover ONE turn |
Destroyed |
|
NOTES:
* Ranking - this is the 'ranking order' with multiple hits. If a target receives more than one hit then only the 'worst' is acted upon. 'Worst' is defined as having the highest number in the ranking order. ie if a Dalek takes two hits with the result of a 7 and an 8, it doesn't "7: lose temper" (ranked 4), it is "8: Destroyed" (ranked 5).
|
||||||
![]()
Rules Appendix
D - Examples Of
Play
 |
|
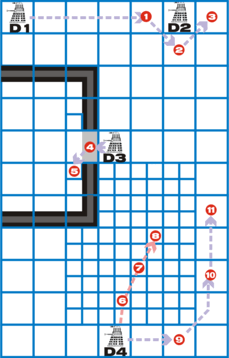
The diagram on the
left is a stylised representation of part of the playing area. Dalek {D3} decides to check in the room for an encounter. It uses one action to open the door (in grey), another to move through the small square (4) in the doorway, then turns. and moves diagonally to point (5). Its third action is used to search the room, and it still has one action to spend (it might fire once at the Cybermen that have just been released in to the room, for example, or it might retreat back out through the door) Dalek {D4} is in an aggressive
mood and wants to fire at {D2}. At present, however its at medium range
(7-12 large squares), so it will only get 2 dice per shot. It would normally
be much better to fire at close range (up to 6 large squares = 3 dice),
but theres a problem the floor area in front of {D4} is bad going
(denoted by each large square being split into 4 smaller ones), and so
it will cost three actions to progress through points 6-8, leaving only
one action left for firing. At point (8)
Dalek D4 is still at medium range (7 squares away). Alternatively, D4
could stay put, rolling 3 shots with 2 dice, rather than 1 shot with two
(remember, it cant use all four action points to fire, only three). |
![]()
Rules
Appendix E - Examples
Of Firing
| A basic Dalek {D2} with no special weapon attributes wants to fire at Dalek {D3} before it gets to the room. | |
| Assuming that {D3} doesnt have any special defensive measures, at a range of up to 6 large squares each shot would roll 3d6e (Warlords Extreme Dice). | |
| Although it can also see {D4}, it must declare all targets before rolling, and so uses three actions (the maximum) at {D3} to try and ensure a kill. In any case, at medium range (7-12 squares) each shot is only 2 dice tricky although not as bad as long range (13+ squares) when you only get ONE dice. | |
| You get ONE hit for every 6 points scored, so on a total of 14 for the first roll this would be TWO straight rolls on the Damage Resolution table. If these only score a miss and stunned (thus blocking the doorway) it would have to try again. | |
| The 2nd roll scores a total of 5 no hits at all! | |
| The third roll scores 18 3 hits! One of the subsequent effect rolls finally destroys poor old {D3}. If the Dalek had been destroyed on the second roll - the player having already declared all three shots at the start - this last action is effectively void. |
NOTE: If Dalek {D2} had been one of the special Special-Weapons Daleks, it would have been rolling twice the normal number of d6es!
![]()