Hammer's Slammers: Model vehicle painting & finishing
|

|
|
Paint
|
| Painting techniques used were
quite varied. Some of the Slammers vehicles were sprayed with car primer
and the finish brush painted directly onto that surface. They were then
drybrushed and given oil washes. |
|
| Other Slammers tanks were
airbrushed grey and the Barthe vehicles were airbrushed camouflaged then
airbrushed with dirt over that. They were then hand painted with highlights
and, again, an oil wash was applied. The Thunderbolt Division vehicles camouflage
were brush painted with hand painted highlights and a little drybushing
and dirtying down. |

|
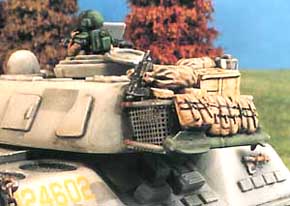
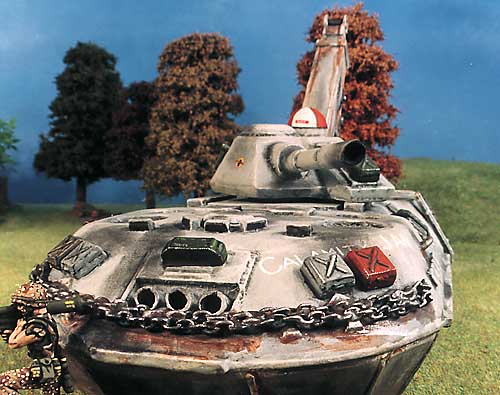
All vehicles were treated to a final dirtying
process. This was the use of artists chalks. Three colours - black, brown
and orange - of these sticks of chalk (obtainable in any decent art shop)
were formed into small piles by rubbing on a sheet of coarse sand paper.
This powder was then applied with an old brush into corners of the model.
Excess can be wiped off and - I must say - the result is very effective,
especially if, like me, you don't possess the skills, equipment and/or time
to use an air brush.
We all used various different paints on these vehicles: other than acrylic
car primer, Kevin used Tamiya acrylics via his airbrush for virtually all
of his work; Graham and Mick used mostly Humbrol enamels and I brush painted
with Humbrol and Tamiya acrylics.
When the painting was 'finished', the vehicles were glossed using an airbrush
with Humbrol polyurethane varnish. The gloss is essential for the next stage:
|
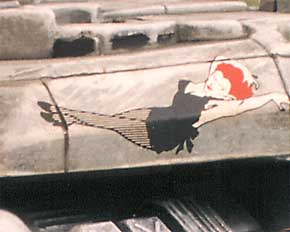
| Transfers |
| These were applied over the gloss varnish
using water to soak them off the carrier sheet and then two products: Microscale
Microset to 'glue' them down, and Microscale Microsol to soften them and
'suck' them onto any uneven surfaces on the models. |
 |
 |
These products - over the gloss varnish - are a must if you
want to achieve the right look. Without them, transfers will almost always
go 'silver' as air is trapped underneath them and - in a worst case - actually
lift from the surface of the model and flake off. |
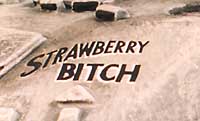
| The transfers that we used were almost exclusively
1/72nd and 1/48th scale aircraft transfers - nose art from WW2 bombers,
for the most part - and some other items (warning signs and the like) from
more modern aircraft. These were manufacturer by Superscale International:
an American company which makes some of the best quality transfers available.
Superscale transfers and the Microscale chemicals for getting those transfers
to 'go down and stay down' are available from a company called Hannants.
They have a shop in north London (020 8205 6697) and a warehouse in Lowestoft
(01502 517 444) from which a catalogue can be obtained. |
 |
Finally, the vehicles were given a coating of
Humbrol matt enamel varnish, again, via an airbrush. This double varnishing
process may seem elaborate but, other than its importance in getting the
transfers to stay down, it does give the paint job enormous robustness in
everyday, wargames usage.
The models for the games were built and finished by a team of four club
members: Kevin Dallimore, Graham Green, Mick Penver and John Treadaway.
|
All vehicles were produced by Ground Zero Games,
figures by GZG and Denizen miniatures and terrain was scratch built.
Photography and site development by John Treadaway.
|
| Click here for Modelling,
Conversions - part
1 , part 2,
& part 3, Painting
& Finishing, Scenery,
Game rules, Figures |