Hammer's Slammers: Model vehicle modelling
|
 |
The research from
the author's books and design for the bespoke Slammers vehicles was carried
out during 1998/1999 and this material sent to Ground Zero Games who wanted
to add material of this type to their range.
Having obtained the basic vehicles, the first task, then, was to look into
how they could be improved. When a model vehicle is manufactured for wargaming
as opposed to military modelling, they tend to be a little basic in places.
Most historical wargaming vehicle kits are simpler than their military modelling
counterparts but one of the easiest items to add to jazz up a vehicle model
is stowage.
|
 |
|
|
Any reference material of vehicles in combat
shows that, in very short order, crews cover their mounts - which, after
all, are their temporary homes and transport as well as fighting vehicles
- in all manner of gear. I used a lot of photographic reference material
of Israeli AFV's over the last 30 years and American vehicles in Vietnam,
all of which showed them very heavily laden with stowage. But where does
one get "stowage", what sort should one use and where should one stick it?
|
|
For SF vehicles, fortunately, there are two
good sources: GZG themselves (01449 722 322), and a company called Marbeth
(01283 814984 ) who - aside from making their own excellent range of resin
SF vehicles - make extra stowage for them. "Kit" from these companies takes
two forms: bigger items are in resin, including some bigger gun barrels
(especially some nicely moulded ones from Marbeth), but smaller items tend
to be in white metal.
Both these manufacturers make boxes for missiles and their launch systems
- as seen on the turret sides of some modern AFV's. All of these items are
useful but can be added to. For example' various manufacturers make packs
of 1/72 scale aircraft missiles for superdetailing modern aircraft which
make useful additions to SF aircraft or on launch rails on vehicles. Spare
helmets look good and - if you want one from a specific figure - they can
be clipped or sawn off the little chaps themselves, though that's an expensive
way of doing things. Chain and hawsers often look effective and can be added
from thin nylon cord soaked in glue (PVA or super glue) and small lengths
of cheap jewellery chain, similarly soaked in cyanoacrylate.
Aerials can be added from thin wire with their bases secured in the vehicle
by drilling a hole with a mini drill. |
|
| Model vehicles sometimes come with white metal hatches which
can be glued in the 'shut' position or - with or without a crew figure -
can be glued 'open'. 'Open', in this case, could mean flat with the hull
or at 45 or 90 degrees, depending on taste, but - in either of those latter,
non flush with the hull positions - the hatch is just gagging to be snapped
off if all that's holding it on is a line of glue at the 'hinge' point.
|
 |
This is a good example of an item that needs
a cut down dress making pin to hold it on, and - to fit that - you'll need
to drill a hole: a mini drill is a handy tool to use for this. Cut the point
off of the pin with pliers until you have, say, 7-10mm of pin with a blunt,
cut end opposite the remaining pin head. Then take a small drill bit - 0.5mm
or so - and carefully (so as not to snap the fragile drill bit) drill through
the hatch at the hinge and into the resin vehicle. Insert the pin using
superglue and, when dry, you'll have a join that'll break the hatch rather
than allow it to snap off the vehicle.
|
 |
Back with stowage; in the real world, crew tend
to hang kit on the outside of crew compartments, which - not being designed
by soldiers - are usually excessively cramped and this practice will probably
continue in the future. Grab handles were added to vehicles where appropriate:
these are usually made from brass wire or pins bent into a 'U' shape and
drilled and glued into place. These can be placed where the crew would need
them: on the route up from the ground to the turret or the rear decking
on tanks seem to be good spots. Often, the crew will then hang items from
these grab rails - packs, water bottles etc - which looks good on a model.
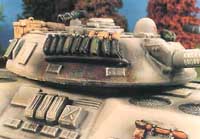
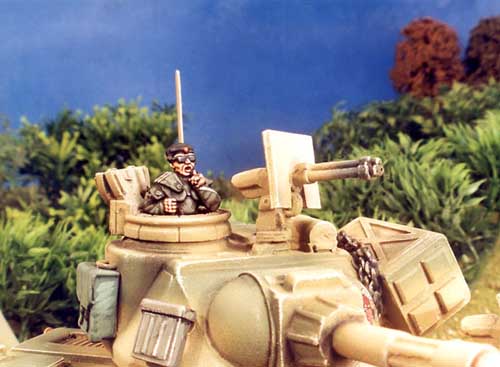
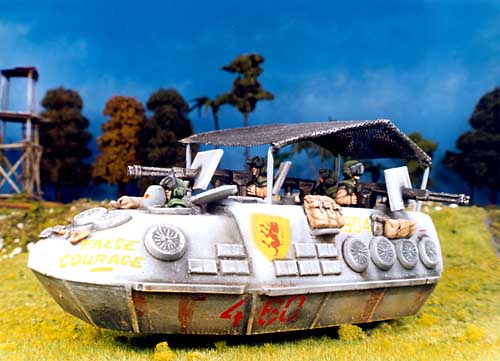
Slammers' tanks need a bustle added to the rear of the turret and the Combat
Car - essentially an open topped vehicle somewhat like a WW2 half track
- needs the "splinter shield" that Drake describes in his books. These are
things that are difficult to make satisfactorily in resin or white metal
so a scratch build is needed. The bustle is relatively easy to make as numerous
examples can be found on modern AFV's: typically they are a mesh basket
that sits on the back of the turret and - sometimes - comes around the rear
sides as well. They tend to be big enough to hold jerry cans and strong
enough to have yet more kit hung on their own outside.
The "splinter shield" was another matter, though
this was described in
the books as a beryllium net shield above the fighting compartment which
was there to stop (not suprisingly) shell splinters and similar but which,
inevitably, became used as a 'roof rack' for extra crew stowage. Fitted
are a pair of hoops that went from front to back on both sides of the fighting
compartment.
Mesh for the splinter shield could come from a number of sources. An easy
route would be to use the aluminium mesh used in repairing car bodies. This
material has many advantages: it's quite cheap; it's easy to work with and
it is available on most high streets. The problem is that, frankly, the
mesh is rather big, meaning that shell splinters would have to be quite
substantial to be stopped by mesh of this gauge.
Alternatively, EMA (01932 228228) are a company who manufacture architectural
supplies and produce a mail order catalogue which lists a wealth of good
stuff. They have a minimum order of £10 or so and, aside from 'wargamer
friendly' items like trees, hedges, flock and the like, they do ranges of
piping and tubing which is superb for industrial buildings and similar (this
was used for the manufacture of the scenery used on the game).
|
|
They also manufacture etched
brass metal mesh with a small hex shaped grid (looking a bit like chicken
wire: code F54). This was used for the Combat Car shields. A different mesh
(F49) with square holes was used for the bustles and baskets. The mesh sheets
are around perhaps 150mm by 75mm which is enough for roughly four combat
cars or a huge number of bustles. Brass wire was used for the hoops.
|

|
The hoops and bustle support frames were bent
to a pattern I drew after a degree of trial and error. The frames were glued
into four drilled holes on the rear of the tank turrets and the splinter
shield hoops were glued into the corners of the Combat Car's fighting compartments.
The mesh was then cut to a pattern with scissors and bent into place with
pliers. Finally, the mesh was glued carefully using super glue. Patience
is required, here, so as not to fill in the fine mesh with glue (or - later
on - paint and varnish).
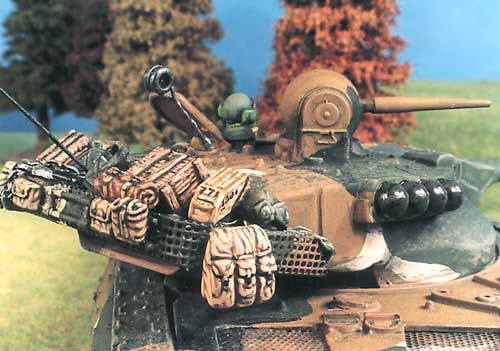
As a final point, the tank bustles were filled with kit which was carefully
glued to itself but not to the bustle. This was so that, when filled up,
the bustle contents could be removed as a unit; painted outside of the vehicle,
and then stuck back in when the vehicle itself was painted. This meant that
paint did not have to be poked through the wire mesh onto the kit within.
|
 |
All vehicles were produced by Ground Zero Games,
figures by GZG and Denizen miniatures and terrain was scratch built.
Photography and site development by John Treadaway.
|
| Click here for Modelling,
Conversions - part
1 , part 2,
& part 3, Painting
& Finishing, Scenery,
Game rules, Figures |